 |
| Chain that always failed to print until I found the retraction option 'lift Z' |
Wednesday, July 10, 2013
Retraction Lift Z
Some designs from thingiverse I could not get printed correctly. This chain always failed to print and this bangle sometimes failed.
Also this tree frog failed from time to time, having three instead of four feet. These designs have in common that they do not have a lot of printer bed contact and that they have discontinuous layers. With discontinuous layer I mean that the design contains gaps in one layer. The solution was the retraction Lift Z option of Slic3r. This option makes the printer head jump over the gaps. It moves up on one site of the gap and moves down on the other site of the gap. With this option set to 0.5 mm I was able to print all of the above designs without any problems. You can set this option using the config.ini file or the Slic3r user interface. In the config.ini file this option is called 'retract_lift'. You can find this option on the Slic3r userinterface on the 'Printer Settings'-tab. If you select 'Extruder 1' on the left, you find the option 'Lift Z' in the group box 'Retraction' on the right.
Tuesday, February 26, 2013
Filament feeder
My printer uses 3 mm filament. 1.75 mm filament is also available. A hot end can support only one diameter, so when you buy a hot end, you have to decide if you want to use 3 or 1.75 mm filament. Switching to another diameter means buying a new hot end. The filament I use is quite stiff and springy and has a strong tendency to tangle. This get worse to the end of the spool, where the diameter gets smaller and smaller. I can imagine this less of a problem if you have 1.75 mm filament. This makes feeding the filament to the printer a non trivial task. In my first setup, I had a spool with filament laying besides the printer. That was far from ideal, because I could not leave it alone. I constantly had to monitor the unwinding and every few minutes, I had to untangle the filament. It would be great, if I could start the system and leave it alone until the print is ready. In my current setup, I use a printed spool holder.
The spool holder has bearings for optimal unwinding. To avoid tangling of the filament between the spool and the printer I use a PTFE-tube. To prevent the tube from getting pulled into the extruder, I have printed a washer which is placed at the end of the tube at the extruder. It lets the filament go through and blocks the tube from getting pulled into the extruder. Up till now I am very happy the results of this setup: now I can start a print that takes for example five hours and leave it alone until the print is ready. Mission accomplished!
 |
| Printer and spool holder |
Thursday, February 14, 2013
Optimize (PLA) print
Update Slic3r
The first improvement in print quality was achieved by upgrading Slic3r from 0.7.1 to 0.9.8. As described in my post of last January 17.
Airflow
My first print was a glass from thingiverse. The foot printed fine. The stem was troublesome. I had to blow air (with my mouth) to get a reasonable quality.
When printing the stem, the nozzle keeps adding hot PLA to the same small spot without waiting for it to cool down and harden. I added a small 40 mm fan to automate my mouth blowing. When I tried the glass again with this fan in place, it turned out that the airflow of the small fan wasn't enough. See the glass in the middle on the image above. In this interview with Alessandro Ranellucci, the developer of Slic3r, I noticed that he had a fan mounted in the back of his printer frame. I took a fan scavenged from an old computer power supply and mounted it on the frame using some tie-wraps.
I noticed that when printing big objects (objects touch a lot of the printer bed surface), the corners will bend more when the fan is on. So for some objects you want the fan on and for others you want it off. I installed a switch to easily switch the fan on and off, depending on the object to be printed. I assume a heated bed will take care of the bending in case of printing objects that touch a lot of the printer bed surface, but for now switching off the fan works okay for me.
Finer steps
My printer has a 0.35 mm nozzle and I originally had the layer height set to 0.25 mm. You can set this value in Slic3r. I tried a value of 0.1 mm. Slic3r will do all calculations necessary to deliver the right amount of filament for the height and speed setting. The result was very smooth. Downside is the much longer print time.
The first improvement in print quality was achieved by upgrading Slic3r from 0.7.1 to 0.9.8. As described in my post of last January 17.
Airflow
My first print was a glass from thingiverse. The foot printed fine. The stem was troublesome. I had to blow air (with my mouth) to get a reasonable quality.
 |
| Left blown by mouth, middle with small 40 mm fan, on the right with big fan mounted in the printer frame |
 |
| A fan is mounted on the printer frame using tie-wraps |
Finer steps
My printer has a 0.35 mm nozzle and I originally had the layer height set to 0.25 mm. You can set this value in Slic3r. I tried a value of 0.1 mm. Slic3r will do all calculations necessary to deliver the right amount of filament for the height and speed setting. The result was very smooth. Downside is the much longer print time.
Sunday, January 20, 2013
STL view and repair tool
STL (STereoLithography) is a file format native to the stereolithography CAD software created by 3D Systems. STL files describe only the surface geometry of a three dimensional object without any representation of color, texture or other common CAD model attributes. All the things you get from www.thingiverse.com are in STL format. I found netfabb Studio Basic when I was looking for a free STL viewer. It turned out that I could not only view STL files, but also repair, measure and cut STL files.
Viewing STL files
After opening the STL file in netfabb, you can zoom in and out, using the mouse scroll wheel. You can turn the object clicking the right mouse button and dragging the mouse.
Automatic STL repair
I have used the repair function quite a few times. When you load a STL file for viewing, netfabb notifies you when a repair action is necessary. You get a warning when you slice such a file with Slic3r in Pronterface. netfabb notifies you by showing an exclamation mark in the lower right corner. For example the whistle: http://www.thingiverse.com/thing:1046. My first print wasn't even hollow! The automatic repair function fixed that for me. You can fix a STL file using netfabb by following these steps:
Netfabb allows you to cut a model in pieces and save each part as a separate STL file. This was convenient when I wanted to print the cap of a bottle in a different color than the bottle itself. The buttons and sliders in the lower right corner allow you to make a cut in the X, Y and/or Z axis. The part in the image is the Twisted Bottle available in thingiverse. Use the slider to select a point where to cut. Then press the 'Execute cut' and 'Cut' button. After this you can select the cap and the bottle individually and save them as a separate STL file by clicking 'Part/Export part/as STL' from the menu.
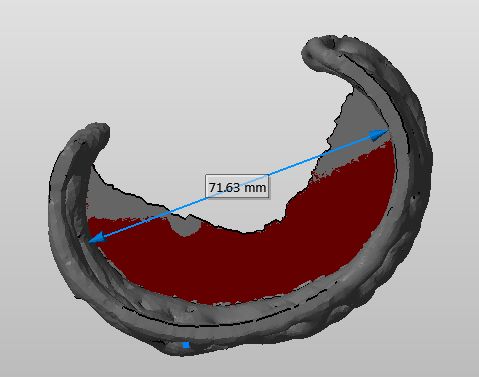 Another feature that I find convenient, is the measure tool in netfabb. It allows you to measure an object in the STL file. I have used it to scale a bangle down to fit the wrist of my nine year old daughter. To make a measurement click 'Extras/New Measuring' from the menu. Now click on two points in the model to create a line showing the distance. Use the mouse as described to rotate and zoom the model while placing the measure points.
Viewing STL files
After opening the STL file in netfabb, you can zoom in and out, using the mouse scroll wheel. You can turn the object clicking the right mouse button and dragging the mouse.
Automatic STL repair
 |
| Exclamation mark in netfabb |
- Open the STL using netfabb;
- Notice the exclamation mark in the right lower right corner telling you the STL needs to b repaired;
- On the main menu click 'Extras/Repair part';
- On the main menu Click 'Repair/Automatic repair';
- In the Automatic repair dialog Click 'Execute';
- In the lower right corner click the 'Apply repair' button;
- Click 'Yes' to remove the old part;
- On the main menu click 'Part/Export part/as STL' to save the repaired STL file to disk.
Cut STL files
 |
| STL file cut on X axis |
Measure
Another feature that I find convenient, is the measure tool in netfabb. It allows you to measure an object in the STL file. I have used it to scale a bangle down to fit the wrist of my nine year old daughter. To make a measurement click 'Extras/New Measuring' from the menu. Now click on two points in the model to create a line showing the distance. Use the mouse as described to rotate and zoom the model while placing the measure points.Thursday, January 17, 2013
Slic3r 0.7.1 versus 0.9.8
The precompiled Pronterface I am using comes with Slic3r version 0.7.1. The current version of Slic3r as I write this text is 0.9.8. Slic3r is the tool you need to convert a digital 3D model into printing instructions for your 3D printer. It cuts the model into horizontal slices (layers), generates toolpaths to fill them and calculates the amount of material to be extruded. An issue with the printed result made me decide to try the new version.
The left part in the picture is sliced with Slic3r 0.7.1 and the right part is sliced with Slic3r 0.9.8. The difference is that the left part has hollow walls. The hollow walls made me decide to try the new version. Note that the hollow walls are not part of the design! You can check out the design yourself at: http://www.thingiverse.com/thing:20830. As you can see on the right, this issue is fixed in the latest version. Another improvement, Coen pointed me at, is that the printed surface is smoother.
When you look closely at the left part in the image above, you notice a line from top to bottom. It marks the place where the printer head made a step to the next Z-level (height). The part on the right does not have this line.
 |
| Part left Slic3r 0.7.1, part right Slic3r 0.9.8 |
 |
| Part left Slic3r 0.7.1, part right Slic3r 0.9.8 |
When you look closely at the left part in the image above, you notice a line from top to bottom. It marks the place where the printer head made a step to the next Z-level (height). The part on the right does not have this line.
Subscribe to:
Posts (Atom)